Pages

Showing posts with label kitchen hacks. Show all posts

Friday, November 7, 2014

Comfort Food For the weekdays: Itlain Sausage in Angle Hair Pasta

Pasta is one of those dishes that can be quick and pretty good, or slow and Mama Mia good.   I offer a weeknight compromise: Quick pasta, slow rest-of-the-ingredients, and dinner is served on time!
Ingredients:

1lb Italian sausage
1 red onion
4tbs olive oil
1 jar red sauce
2tbs basil
1tbs oregano
1tsp black pepper
1/2 package angle hair pasta

Serves: 4+

Time: 35min

Directions:

1) Start boiling the water.  You will need about 4 cups.  Feel free to add a little salt and olive oil as well, as discussed in prior posts :)

2)Add the olive oil to the pan and turn onto medium heat.  Give extra time to warm up if using an electric oven.

3) Add all the sausage, pre-chopped or separated in the pan.  I prefer to separate in the pan, personally.  Also add your sliced onions at this time.

4) If you choose to use all the spices listed, add them now, so they have time to soften and mellow.  If you are using less spices than listed above, you may want to add them later on so they will taste more potent. Yes, spices are always optional.  Well... usually.

5) While you are cooking the meat thoroughly, and keeping a close eye on it, add the pasta to the boiling water.

6) Add most of the the jar of red sauce to the pan.*

*The reason for "most of the jar" is you may want to save a little out for making pizza!  Its super easy to do with pasta left overs.  Just save a little of the sliced onion, and a little of the meat too-- all in separate baggies of course.  We will come back to this at a later post ;)

7) Angle hair pasta cooks quickly, making it both elegant and time efficient.  After about 5 to 7 minutes, you should be prepared to drain the pasta and add it directly to the pan of yummy stuff.

8) Mix everything well and serve hot!

Cost:

Italian sausage    $3.56
red onion            $0.50
olive oil              $0.20
red sauce            $2.00
spices                 $0.35
pasta                   $0.50      
Total                  $7.11
Per serving         $1.77


Thursday, November 6, 2014

Savory Butternut Squash Soup

The wonder of the fall is upon us, and with it the warm fuzzy feelings that come with the holiday season.  One of my favorite for these family times is butternut squash soup!  I hope it keeps you as warm as has kept my family :)


Ingredients:
1 large butternut squash
1 large red onion
2 large bake potatoes
2 small apples
16 oz concentrated chicken stock
1tbs cinnamon
1tsp paprika
1tsp nutmeg
1tbs black pepper
1tbs basil
1tsp thyme
1/2c butter

Serves: 8+

Time:
To prepare         20min
To cook             4 hr on high, or 6 hr on low
Total                 1 day

Directions:

1) Peel the uncooked butternut squash and potatoes.  You will also need to slice the squash down the middle so that you can scoop the seeds out.

2) Chop all ingredients into large chunks and fit into the crock pot.  Play tetris with the food if need be!

3) Add the chicken stock and 8 oz of water over the top.  Now you can add your spices as well right to the top!!

4) Start the crock pot on low-- Then move to high as you need to for timing.  

5) Puree the cooked and hot ingredients.  You can do this literally in a blender-- works great!-- or with a hand held blender, such as Cuisinart's 2 speeder.

6) Spoon the soup into a bowl.  The soup should be pretty thick-- So think that you can draw a swirl in it with the back of a spoon.

7) Melt, SLOWLY, the 1/2c of butter in the microwave.  It's best to do this in many intervals of short time. So 10-15 seconds a go.

8) Give the butter a minute to settle before straining through a cheese cloth-- or paper towel.  The paper towel honestly doesn't work as well, but I for one do not have cheese clothes on hand. 

9) Congrats-- You have just made clarified butter!  Now spoon it into the soup swirl and serve warm.
Cost:

butternut squash       $2.00
red onion                  $0.50
bake potatoes           $1.00
apples                       $0.50
chicken stock           $1.20
spices                       $0.60
butter                        $0.50      
Total                        $6.30
Per serving               $0.78


Friday, October 24, 2014

Almond Stirr Fry

So the beauty of stir fry is its versatility.  Hence the million and one recipes on the internet... This is the ONLY recipe I know of that includes whole almonds as the major source or protein.  
(Broccoli is also a source of protein as well, and I did add one small chicken tender to make my husband happy :) )

Ingredients:

1/2c   chopped broccoli
1/4c   chopped carrots
1/2c   chopped celery 
3/4c   whole roasted almonds
2 tbs  sesame seeds
1 tbs  Sriracha
1 tsp  garlic powder
4tbs   oil
3-4c  cooked white rice
1/4c  flour (OR "flat" Bisquick! See prior post)

Serves: 3-4 people
Time: 15 min

Directions:

1) Add 2 tbs of the oil, (vegetable oil works best for most Asian food, at least in my opinion), to a large skillet and heat until the oil just starts to crackle. This should take about 2 min.

2) Add your chopped veggies and seasoning to hot pan.  Cover to let the veggies steam a little-- Like 5 min.

3) Add the almonds and keep the skillet uncovered from here forward to keep the almonds from getting too soft.

4) Turn over the ingredients on medium heat for another 5 minutes or so.


5) Make a roux, pronounce "rue," from the flour and about 1/2c of warm water.  You do this by mixing the flour with the warm water vigorously, so that when you add the flour to the dish it doesn't clump. (You could also do this with old Bisquick, as mentioned earlier... although add less rather than more, as you don't want to undercut the Asian flavors.)

6) Add this roux to the veggie mix to thicken the stir fry texture.

7) Once the veggies look just under cooked, (so the carrots can have a fork almost stuck in them with ease), add the rice and the rest of the oil.
8) Work the rice into the dish until each gain of rice looks like it has delicious flavors on it!  You definitely don't want any clumps of rice.

 9) Serve HOT!


Cost:
Veggies         $0.75
Almonds       $1.00
Rice              $0.30
Oil                $0.50
Seasonings    $0.30      
Total             $2.85
Per serving   $0.72


Tuesday, October 21, 2014

Waste not Want not: The Old Bisquick Addition

So this will be another of those post that I will add to with time :)  Feel free to check back.  

Basically, buying in bulk, on sale, or being gifted food is GREAT... Until the food goes bad.  In the case of Bisquick, the Costco size container is great, but hard to go through unless you really love pancakes.  This blog is about alternative uses for "flat" Bisquick.  In other words, the baking soda is no longer rising.

Option 1
Makeshift Flap Jacks
These denser cakes will fall someplace between the British and the american style.  If you really want to confuse people, add rolled oats and honey to the mix-- Literally.

Option 2
Better-Than-Mom's Chicken Soup
Make your mom's-- And then add about 3 tbs of "flat" Bisquick to the broth.  This works best if you first whisk the Bisquick about 3/4 cup of hot water before adding the liquid mix to the actual soup.  Make sure to sure as you add, so you don't get clumps! The Bisquick will give the soup and extra hearty taste! (And look!)

Option 3
Extra American Shepard's Pie
Little known fact: Shepard's pie was coined in America.  Newly coined fact:  If you cut the potato flake crust with "flat" Bisquick, you get a more bakery style crust on this casual dish.  

Option 4
American Style Stirr Fry!
For full details: See Almond Stirr Fry details, but I'm sure you get the picture ;)

Sunday, September 14, 2014

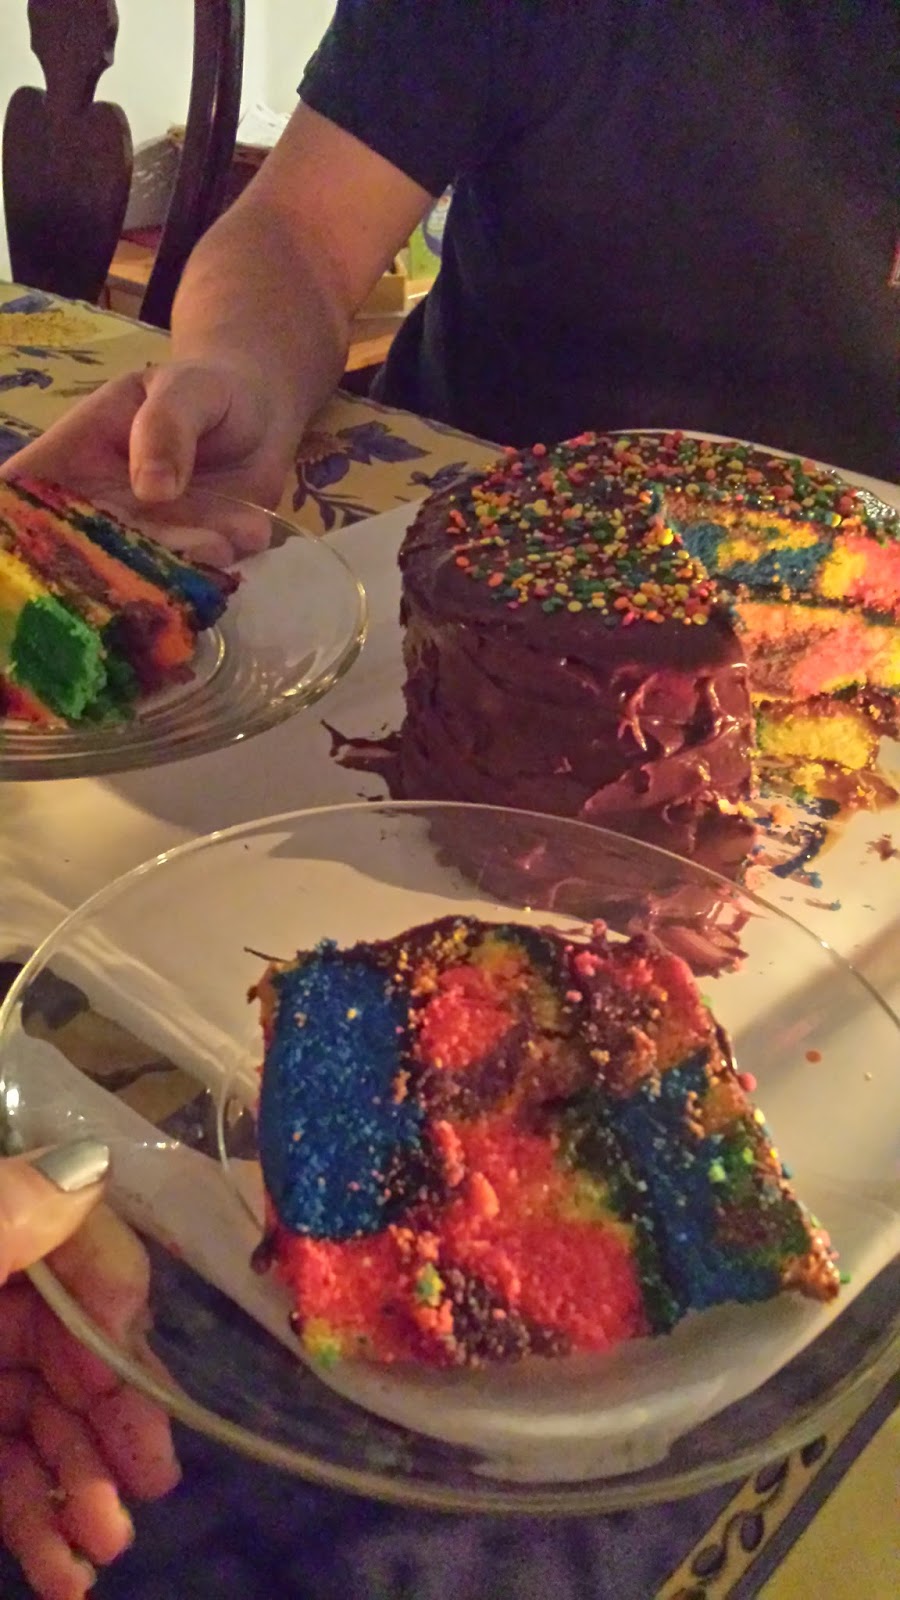
The Most Colorful Birthday Cake EVER

This three layer tie-dye Birthday Cake with homemade custard filling and chocolate frosting "takes the cake" for both the best looking and the best tasting birthday cake I have ever enjoyed.  My husband made it for me, so please bare with me through some of the photos, etc. (Disclaimer: Initial idea did come from a box mix.  However, this blog is about how to take that box mix and make it that much more awesome!)
Ingredients:

1        box (Tie tie cake OR white cake)
3        egg (or as box reads)
1/3 c  oil (or as box reads)
food coloring
2 tbs white sugar
2 tbs molasses
1 tbs butter
frosting (or powered white sugar)
8 inch round cake pan (or smaller), or something close to this :) 

Time: 
2 hours total

I have to say, although my role was more supervision on this one-- Just watching this cake get made was a blast!  Feel free to have fun with it, as there will never be another cake like it-- even if all your cakes are tie-dye from this day forth! A nice thing about this particular cake is that quickly getting the batter into the oven is not as important.  So make sure to relax and enjoy the fun :)

Directions:

1) Make up the cake as instructed EXCEPT, do not include the yoke of the egg.  An easy way to do this is to crack the egg without letting the inside of the egg fall into the bowl.  Then, over a bowl, pass the egg yoke back and forth between the two shells until nearly all of the translucent "whites" of the egg are in the bowl, and the yoke is still in one of the shell halves.  Set the yokes aside for now.

2) Preheat the oven to 350.

3) Divide the cake batter into 5 (or more) bowls. 

4) Mix in food coloring to make intense colored batter. Go heavier rather than lighter on the food coloring.  And feel free to get creative!  The purple on the right was a good five minute project for my husband as he got it 'just right.'
5) Add about a third of all the batter colors to your greased 8 inch round pan.  If you don't have an 8 nice round pan, a small crock pot dish also works well! (Featured above.)  Make sure to pour in one place for each color, so that batter color can sink to the bottom of the cake.

6) Bake each round for 30 minutes.  If you only have one pan, wait ten minutes before removing the baked cake layer from the pan.

7) Repeat 4 through 6 for the other two layers!

8) While you are making the layers of the cake, you can start on the filling: Take the three egg yokes, two tbs molasses, 2 tbs white sugar, and 1 tbs butter.  If inclined, add a 1/4 tsp of orange extract as well.  In a small double broiler, beat the custard mixture continuously over low heat.  If you don't have a double broiler, then put the ingredients in a small metal mixing bowl, and the water (for the broiler) in a small pot. Balance the metal bowl in the small pot that is 1/3 filled with water.  No mater what you use to this, mix continually! 

9) Once all bake layers are baked and cooled, it's time to construct the cake.  One whatever dish you will be serving the cake, place the first round.  Add 1/2 of your custard mixture to the top.  Then add your next round and repeat.  After the last round is on top-- It's frosting time! You can use a pre made mix, (like I said my husband was doing this one), or you can make the frosting.  As this is a budget friendly blog, I recommend making it.  Just combine well 1/4 cup butter and 3 cups powdered sugar.  Add coloring or flavorings of choice to that.  Some butter frostings have milk, but I find the frosting is stiffer without it.
10)  Add the sprinkles!  This is a very important step :D

11) Sever up!
Cost:
box cake mix     $3
egg                    $0.60
oil                      $0.10
food coloring    $0.20
white sugar       $0.20
molasses           $0.45
butter                $0.25
frosting             $3.00 or less
Total                 $7.80


The Chef at his best!


A very happy birthday to me :)


Even the crumbs are fun!