Pages

Sunday, September 21, 2014

Asian Fusion Pizza!

So it's a Sunday, and I feel like pizza :)  But not just any pizza: Asian Fusion Pizza with sesame and garlic based sauce topped with Muenster cheese, onions, broccoli, sausage and fresh greens!  Served on a Agave pizza crust!
Ingredients:

The Pizza!
1/4      white onion
1c       grated muenster cheese, ( for finally chopped)
4 tbs   Asian Toasted Seasame Seed Dressing
2-4     sausages, pretty much any kind, cooked
1 1/2c spring greens, washed
1c       fresh broccoli

The Dough!
(This should make you think twice about buying ready made pizza crusts!)
2 1/2 c all purpose flour
1 tbs    agave
1 tsp    salt
1 pkg  quick active dry yeast (or Rapid)
3 tbs   olive oil
1 c.    very warm water
(But no boiling!  Boiling will run the risk of killing the yeast)

Serving: 4 people, easily
Time: 1 hour all in

This recipe will definitely demonstrate what a hodgepodge cooker I am.  If it's in the fridge, it's game to be used!  Point and case, the "sauce" for this pizza is salad dressing-- And it will be amazing!!  Just trust me :)

For recipe involving dough, you always need to read the whole recipe first to know if you need to make the dough first or the 'filling,' so to speak.  Timing is much more important if anything has yeast in it.  There are precise chemical reactions going on to make your food yummy!

For this recipe, and all pizza recipes, start with the dough.

Directions:

1) In a large mixing bowl, add the flour, salt, package yeast, and agave.  Do not mix yet.  There are a lot of pizza recipes out there that get very elaborate at this point.  Although this is an important step, getting fancy doesn't make the dough taste better nor does it make your time in the kitchen more enjoyable.

2) Add the warm water evenly over the top. Slowly pour until you can no longer visibly see the yeast.


3) Mix thoroughly for 5 to 7 minutes.  The dough should be between tacky and stringy at this point.  Add more flour or warm water as necessary.  Be careful with the water-- A little goes a LONG way.

4) Ball the dough loosely in the middle of the bowl and cover loosely with cling wrap.   Do not use a damp cloth unless you hate that cloth-- I have definitely wrecked cloths that way.


5) Set aside for 30 min.  If you aren't ready for dinner just yet, set in the fridge for 3 to 4 hours.

6) Prepare the toppings, including grating or chopping the cheese.

7) This is also a good point to start preheating the oven to 400 degrees.  If thick crust, 375, and if thin crust 425 will work best.

8) Once the dough has more than doubled in size, with floured hands and on a floured surface, work the dough into the round disc everyone associates with pizza!

9) Place the dough on a backing sheet, that has flour or cornmeal spread on it, for easy lift off at the end :)

10) Add the dressing 'sauce' to the dough, and spread around smoothly with the back of a spoon up to 1/4 inch from the edge of the dough.

11) Add cheese and toppings as desired.

12) Bake for 20 min OR LESS.

13) Add the fresh greens to the top of the pizza after slicing.

14) Serve warm!

Cost:

All purpose flour                     $0.50
Agave                                     $0.10
Salt                                          $0.02
Quick active dry yeast            $0.50
Olive oil                                  $0.20
White onion                            $0.25
Muenster cheese                     $0.75
Asian Toasted... Dressing      $0.20
Sausages                                 $1.00
Spring greens                         $0.30
Broccoli                                  $0.20
Total                                       $4.02
Per serving                             $1.00


How much pizza this recipe actually makes!!


Sunday, September 14, 2014

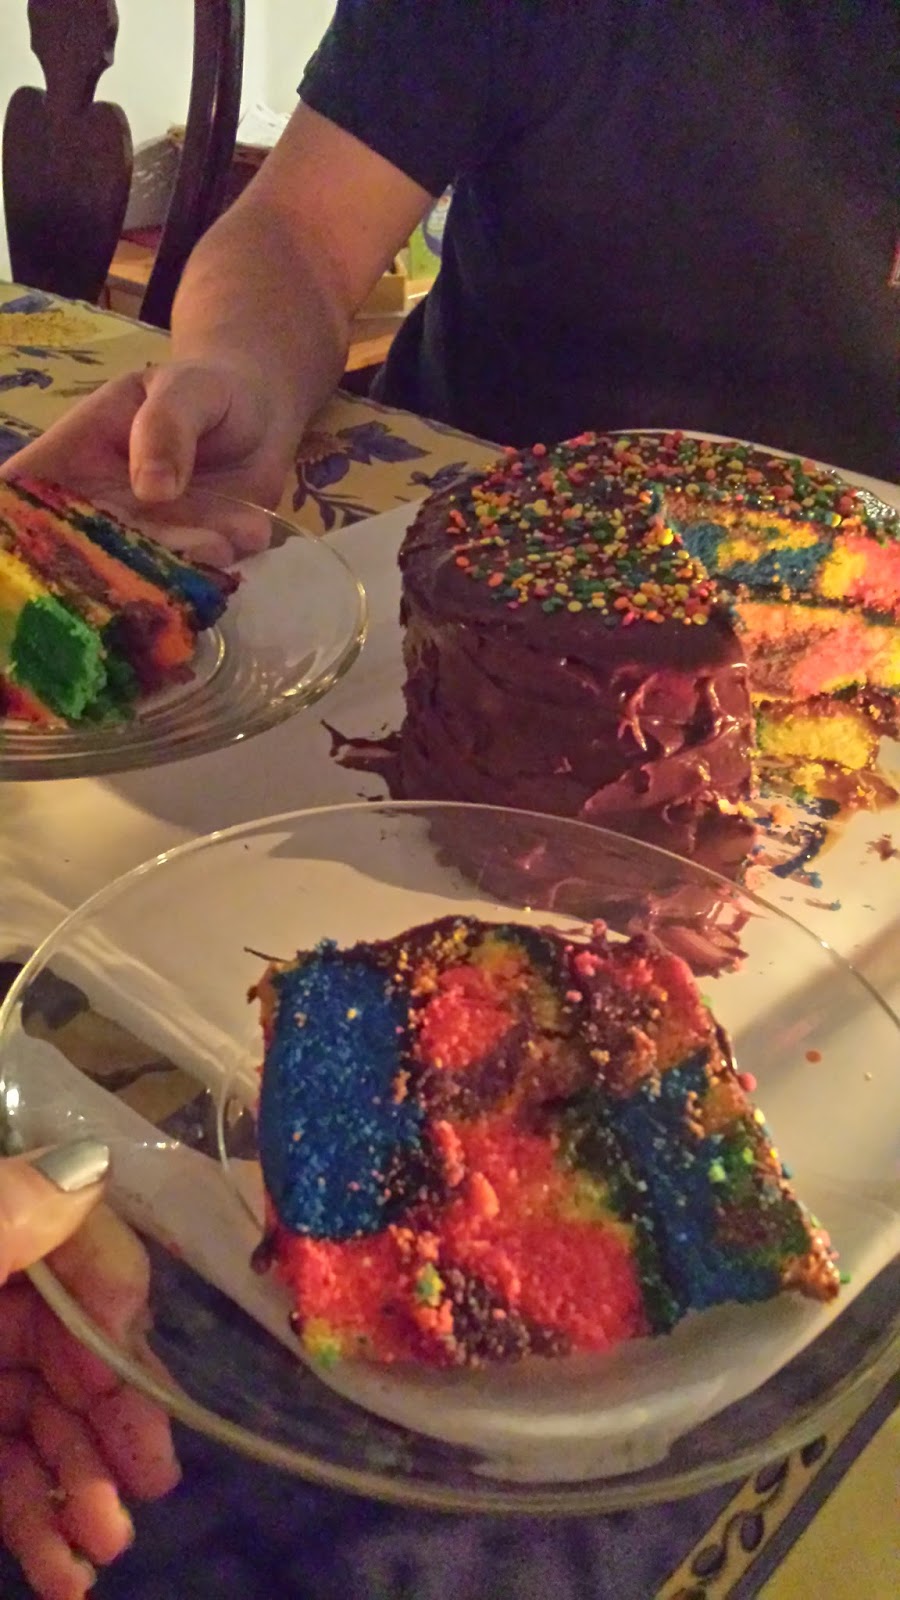
The Most Colorful Birthday Cake EVER

This three layer tie-dye Birthday Cake with homemade custard filling and chocolate frosting "takes the cake" for both the best looking and the best tasting birthday cake I have ever enjoyed.  My husband made it for me, so please bare with me through some of the photos, etc. (Disclaimer: Initial idea did come from a box mix.  However, this blog is about how to take that box mix and make it that much more awesome!)
Ingredients:

1        box (Tie tie cake OR white cake)
3        egg (or as box reads)
1/3 c  oil (or as box reads)
food coloring
2 tbs white sugar
2 tbs molasses
1 tbs butter
frosting (or powered white sugar)
8 inch round cake pan (or smaller), or something close to this :) 

Time: 
2 hours total

I have to say, although my role was more supervision on this one-- Just watching this cake get made was a blast!  Feel free to have fun with it, as there will never be another cake like it-- even if all your cakes are tie-dye from this day forth! A nice thing about this particular cake is that quickly getting the batter into the oven is not as important.  So make sure to relax and enjoy the fun :)

Directions:

1) Make up the cake as instructed EXCEPT, do not include the yoke of the egg.  An easy way to do this is to crack the egg without letting the inside of the egg fall into the bowl.  Then, over a bowl, pass the egg yoke back and forth between the two shells until nearly all of the translucent "whites" of the egg are in the bowl, and the yoke is still in one of the shell halves.  Set the yokes aside for now.

2) Preheat the oven to 350.

3) Divide the cake batter into 5 (or more) bowls. 

4) Mix in food coloring to make intense colored batter. Go heavier rather than lighter on the food coloring.  And feel free to get creative!  The purple on the right was a good five minute project for my husband as he got it 'just right.'
5) Add about a third of all the batter colors to your greased 8 inch round pan.  If you don't have an 8 nice round pan, a small crock pot dish also works well! (Featured above.)  Make sure to pour in one place for each color, so that batter color can sink to the bottom of the cake.

6) Bake each round for 30 minutes.  If you only have one pan, wait ten minutes before removing the baked cake layer from the pan.

7) Repeat 4 through 6 for the other two layers!

8) While you are making the layers of the cake, you can start on the filling: Take the three egg yokes, two tbs molasses, 2 tbs white sugar, and 1 tbs butter.  If inclined, add a 1/4 tsp of orange extract as well.  In a small double broiler, beat the custard mixture continuously over low heat.  If you don't have a double broiler, then put the ingredients in a small metal mixing bowl, and the water (for the broiler) in a small pot. Balance the metal bowl in the small pot that is 1/3 filled with water.  No mater what you use to this, mix continually! 

9) Once all bake layers are baked and cooled, it's time to construct the cake.  One whatever dish you will be serving the cake, place the first round.  Add 1/2 of your custard mixture to the top.  Then add your next round and repeat.  After the last round is on top-- It's frosting time! You can use a pre made mix, (like I said my husband was doing this one), or you can make the frosting.  As this is a budget friendly blog, I recommend making it.  Just combine well 1/4 cup butter and 3 cups powdered sugar.  Add coloring or flavorings of choice to that.  Some butter frostings have milk, but I find the frosting is stiffer without it.
10)  Add the sprinkles!  This is a very important step :D

11) Sever up!
Cost:
box cake mix     $3
egg                    $0.60
oil                      $0.10
food coloring    $0.20
white sugar       $0.20
molasses           $0.45
butter                $0.25
frosting             $3.00 or less
Total                 $7.80


The Chef at his best!


A very happy birthday to me :)


Even the crumbs are fun!

Wednesday, September 10, 2014

Smokey Chicken Alfredo

Without the smoke!

This is a quick and easy meal that has never failed to trick every person I have ever served it to-- People assume either various (much more expensive) ingredients are in it that are not, or they assume I spent hours making it (which I definitely did not).  So if you are looking for a really easy and fast way to make a fantastic meal: This is it!!


Ingredients:
2         Chicken breasts
7 oz    Shell pasta
3/4 jar Alfredo sauce
2/3 c   Frozen peas
1 tbs   Fresh rosemary
1/2     of a white onion 

Time:
30 min to table!

I would like to add that you can do this "trick" to most pasta dishes (see #  from the directions.)  Also, the way you present this meal does make a difference.  If you slop it in a bowl and say "I'm tired and done..." Everyone will assume it's a box mix.  Is you plate-it-proper and serve it with a small side of red wine-- People will assume you spent hours getting meal prepared.  It's just one of those tricks that are part of the meal-- After all, the meal starting with the eyes.  :)

Directions:

1) Set up the kitchen.  Start the water boiling for the pasta, oil or butter the pan for the chicken, and get the plates heating for the finish!

2) After the oil is hot in the pan, place the chicken breasts, frozen or fresh directly into the pan.  This is one of those meals that no one will ever know the difference. 

3) Add the chopped onions to the pan.  Note: Usually you cook onions first as they take a long time to "sweat-out."  Part of the smokey is that the onions are more done on the outside than the inside.  You want them to be slightly crunchy by the end of the meal.  If you are concerned about the chicken, especially if you are using fresh chicken, just wait to add the onions but you will want to microwave them a few minutes first...

4)  After about ten minutes of watching the pan, flip the chicken and add the frozen peas.  The peas can be clumped.  You do not want to over cook the peas, so the later you add them the better.  (No English food here!!)       

5) Once the chicken is close to fully cooked, add the Alfredo sauce.  People are scared, rightly so, of chicken, but consequently they WAY overcook it. The pan is still hot, the chicken is still cooking, just relax and enjoy the cooking experience! If you are someone who knows you are paranoid about chicken, add the sauce about 3 min. before you want to.  If you are someone who does not know what I'm talking about right now, add the Alfredo sauce when you normally would.
6) Add the pasta to the now boiling water to start cooking.  This means you are 12 minutes from serving to the table!

7) This is the important step! Work the pan with a spatula to get the slightly brown bits of the pan from the onions etc into the sauce. You need a good spatula for this-- But by the time you are done, this should be the easiest pan in the world to clean because EVERYTHING is in the sauce!  For this reason you must add the Alfredo sauce cold to the hot pan.  

8) Work the pan for about 5 minutes.  This just means to continually move all of the contents of the pan around, making sure to scrap the bottom of the pan each time.

9) Add your now cooked and drained pasta to the pan of sauce and chicken directly!

10) Mix well and plate up!  Don't forget the beverage (Wine or otherwise :) )

 Cost:

$2         Chicken breasts
$0.25    Shell pasta  
(Seriously, if you are paying more, you should look into making your own!)
$2         Alfredo sauce
$1         Frozen peas
$0.10    Fresh rosemary
$0.50    White onion           
$5.85 total (serves 2)


Apple Cobbler: The Chocolatized Family Recipe Edition!

(And yes I made up the word chocolatized, 
but it should be a word 
so we are just going to roll with it...)

This recipe will be a side-by-side edition, featuring both the "traditional" and the "chocolatized." Think of it as the Yin and Yang of awesome comfort food deserts!
Ingredients:
Apples (for an eight inch round you will need 12+ small or 7 large sized)
1/2 cup uncooked rolled oats
1/4 cup of unsalted butter
1/3 cup white or brown sugar
And that is it!!

Time: 10 min to prepare
           30 min to bake
             5 min to cool before serving
           45 min TOTAL

So this is definitely one of those deserts that you can stick in the oven and then walk away from to enjoy dinner with your family, friends, and or guests.  As it is the end of the season, I would also like to point out that this recipe is great for apples just past their prime!  It also makes a great breakfast the next day, even cold out of the fridge, just sayin'.

Directions:

1) ALWAYS start with washing your apples.  I don't care where they came from, they should be washed.

2) Chop up desired amount of apples to fill your baking sheet 2/3 full when the apples are loosely packed.

3)Add desired alterations: This is the chocolatizing step!  I recommend adding a 1/4 to a 1/2 lb of walnut dark chocolate fudge to the dish.  Just make 1/2 inch cubes of the fudge and spread it around the dish.

4) Pre-melt the butter with a quick 10 seconds int eh microwave.  Repeat as necessary to reach a mostly melted puddle of butter.  You do not want to burn the butter so better to stop early than late!

5) Add the oats and sugar directly to the butter.  (The less dishes the better the desert!)  Note:  If you have carb loving guest, you can double the crust by just doubling everything that goes into the crust only, aka the butter oats and sugar.


6) Mix crust mixture well with a fork.  The oats should all have a slightly glossy look to them and the sugar should have no dry spots.  After that, it will all even out in the bake :)


7) "Fork" the crust mixture over the top of the apples. All apples to not need to be covered. (See image below.)

8) Bake at 325 degrees for 30 min, or until a light cripsy brown on top.  The apples should be bubbling when you take it out!

9) Let cool before serving! Five minutes is fine.

10) Serve: Al-la-mode or in a milk float or just straight up-- It's a "whatever makes you feel warm and comfy" kind of meal.


Cost:
$3      Apples
$1      Butter
$0.25 Oats
$0.25 Sugar         
$4.50 total 
(Unless add chocolate which usually adds about a buck.)


Delicious, delicious Yin and Yang Apple Cobbler!!!


Wednesday, August 20, 2014

End of Summer Cooler


It's Blue, It's Cool, and It's Pitcher Friendly!
It's the End of Summer Cooler!
Featured above with a watermelon wedge
to add Fourth of July Festiveness!
So I don't know about you but "Blue" drinks are hard to find.  So much of life requires blue: Fourth of July (pictured above), Easter (it's that or pink), Pool Parties (their own holiday), and all blue colored mascot sports parties! Blue also happens to be one of my favorite colors so:

Ingredients:
1 bottle of white wine (Pinot Grigio works great)
3 shots Blue Curacao
1/2 shot Black berry liqueur
2 tbs lemon juice
ICE!

Directions:
Mix all these things into a large pitcher.  Don't forget the garnish!

Quick and Easy Dinner for Two (or more!)

For the work days: A Hearty, Comfort Food, Bake Dish
Potato Casserole

This is one of those meals that can be prepped before hand, even cooked before hand, and the timing is less crucial on.  Meaning:  You throw it in the oven when you first walk in the door and by the time you are actually ready to eat , ( you've read the mail, your changed your work clothes, etc), it's ready... No matter when that is! If you prefer a non-vegetarian version, in between the layers of cheese and the precooked meat of your choice. I strongly recommend some slices of deli cute ham!


Ingredients:
7           redskin potatoes
8-12     slices of white cheese (Mozzarella is great if you want to eat fast)
1/2 cup milk (any kind)
1 tbs     oil (or bacon grease)
seasonings to taste
(deli ham optional)

Prep Time: 30 min
Cook time: variable (10 min to no more than an hour)
Total time: 45 min

Serves: 2*
*If you would like to serve more, just add more potatoes and cheese!

Directions:

1) Boil the washed redskin potatoes in a pan filled with 6 quarts of water.  This can be done the night before, as long as you leave the skin on to protect the potatoes from oxidizing.  An oxidized potato ins't spoiled, but may be less fun of eating them do to it's less slightly appearance.

2) Grease the bottom of your casserole dish with the 1 tbs oil.  Above is a 4X6 Pyrex dish.  The less filled the pan the more crispy the casserole will be.  You can make any size casserole/backing dish work work.

3) Let the potatoes cool to a safe handing temperature.  Cut the potatoes in slices.

4) Layer the casserole dish with a layer of potatoes.  I leave the skins on the potatoes for their appealing red skin color and for extra fiber.

5) Pour just enough milk over the potatoes to cover the surface.  You should not "cover" the potatoes in milk, just "wet" them.  This should take less than 1/4 of a cup of milk.

6) Add a layer of cheese slices.  If you are adding meat, you should do so on top of the "wet" potatoes and before the cheese.

7) Lay another layer of potatoes.  "Wet" with milk again, using less than 1/4 of a cup.  Cover this layer with cheese.*

8) Repeat Steps 6-7 until your casserole dish is full, you run out of an ingredient, or you decide you want to be done.

9) Bake the casserole (uncovered) at 325 degrees for 10 min to an hour.  (The longer you think you will back it the 'harder' the cheese should be.  Feel free to see prior posts on Jarlsberg being a great and cheap hard cheese to back with. Also, if you plan on baking this casserole an hour, add an extra 1/4 cup of milk evenly over the top before you put the dish in.

* I usually add a "pinch" of seasonings to each layer.  A "pinch" begin a light dusting of say black pepper and Italian seasoning.

10) Serve hot and with a cold beverage to finish out your day!

Cost:
redskin potatoes        $2
white cheese              $2
milk                           $0.50
oil                              $0.10
seasonings to taste     $0.15
(deli ham optional)    ($2)                                  
Total:                        $4.75 (or $6.75 with meat)
Cost per person:     $2.37!


Thursday, August 14, 2014

Pumpkin Ravioli in Home-Made Cheese-Potato Sauce with Broccoli Florets

 Just in time for fall! This is a quick and colorful meal that also happens to be well balanced :)

Ingredients:
1  package pumpkin ravioli (available at Costco)
1/2 bag frozen broccoli
1 cup hard white cheese of choice ( recommend: Jarlsberg) grated
3 red potatoes
2 tbs oil ( or bacon grease if so inclined)
1/4 cup milk (reduced milk works better than non-fat milk)

Estimated time: 30 min
Serves 4

So I'm going to make an effort to talk more about the food as there is clearly more to it than throwing some stuff you bought in a pot.  This meal is actually one of my favorite quick-and-easy dishes because 1) It's quick and easy, 2) It's reasonably healthy, 3) It's vegetarian friendly, 4) It stores super well!, and 5) It's easy to adjust to whatever you currently have in your fridge.

Also, my husband has recently quite smoking (YAY!) and broccoli is not only a great source of protein, calcium, and fiber-- Broccoli is also partially good at cleansing you of toxins, specifically including those from cigarette.

Directions:

1) Cook the potatoes.  I prefer boiling them in a pot of water, but that takes longer than microwaving them so it's up to your time schedule.  You will know when the potatoes are done because you will be able to easily stick a fork into them. At that point, let the potatoes cool to the point you can slice them up comfortably.

2) Boil water for the pasta.  Add at pinch of salt (to increase the temperature at which the water boils) and a dash of oil, any kind of oil but I use olive oil, (to help the pasta not stick to itself while it's cooking).

3) Place cooked and sliced potatoes into a bowl and pour the milk over the potatoes. This will keep the potatoes from browning AND will give the potatoes a creamy taste that is oh-so-good!  Let soak at least 7 minutes.

4) To a sauce pan, add the bacon grease to liberally coat the bottom of the pan.Then add the grated cheese. The harder the cheese the more time you will need to give the cheese alone to get "sweated."  Basically, you are just softening up the cheese, which you will know you have done by the limping texture of the cheese, or on thicker pieces, but the droplets of oil that are escaping from the cheese.

5) Add the butter soaked potatoes slices and broccoli to the sauce pan and stir well.  Keep an eye on your sauce pan and stir as needed, which will be often.

Note: If you are using fresh broccoli you may want to pre-steam if for 5-10 minutes.  You can do this in a third pan with some water and and a lid, already brought to boil before the broccoli is added OR in a bowl in the microwave with a WET paper towel placed on top.  Just remember, broccoli is one of those foods that looses it's victims when cooked throughly.

6) Add the pasta to the boiling water.  Let cook 10 min. With the Costco brand, I find the ravioli falls apart if you cook it longer than this...

7) Drain the pasta. Add your broccoli and cheesy potatoes to the pasta.  Mix well. Serve hot!

Definitely feel free to season to taste!  I usually ad basil (because it's my husband favorite), pepper, and cayenne pepper (because tis' mild for a pepper but makes everything look so tasty!).  An easy way to increase the serving size is to add more potatoes and broccoli.

Cost:


Package pumpkin ravioli   $4 (for one of the two jointed packages from Costco)
1/2 bag frozen broccoli      $1.50
hard white cheese              $1
3 red potatoes                    $0.50
oil                                      $0.10
milk                                   $0.15                                              
Total                                 $7.25
Per Serving                      $1.81